Email Capture
Email Capture is a fake SMTP relay service you can send to, where Mailsac captures all the messages.
Email messages sent using Email Capture will not be delivered to
the To recipients but instead will be available by looking up the To
recipient via the Mailsac website or Mailsac API.
By default, captured emails are public. To keep captured mail private, toggle the Make Captured Email Private option in your account settings. This will “star” captured messages.
Sending Using Email Capture
To configure applications to use Email Capture replace existing SMTP configuration with these settings.
- Server Name:
capture.mailsac.com
- Port:
5587
- Use Secure Connection:
Yes (TLS)
- User Authentication:
Yes (Username: Mailsac username Password: Mailsac: API key)
Some SMTP libraries or clients may not support the use of a username that is different from the
Fromaddress. In that case, theFromaddress will need to be added as an Enhanced Address or be an address in a Custom Domain. The enhanced address or address in a Custom Domain can then be used with the Mailsac API Key as authentication to the Capture service.
const nodemailer = require('nodemailer')

const mailsaUserName = 'MAILSAC_USERNAME'
const mailsacAPIKey = 'MAILSAC_API_KEY'

const transporter = nodemailer.createTransport({
  host: 'capture.mailsac.com',
  port: 5587,
  // will use TLS by upgrading later in the connection with STARTTLS
  secure: false,
  auth: {
    user: mailsaUserName,
    pass: mailsacAPIKey
  }
})

transporter.sendMail({
  from: '"Mywebapp Customer Support" no-reply@mywebapp.com',
  to: 'mycustomer@gmail.com',
  subject: 'Password reset',
  text: `Click on the link to reset you password
    https://mywebapp.com/password-reset/PasswordResetToken`
})
  .then(response => {
    console.log('Successfully sent mail', response)
  })
  .catch(err => {
    console.log('Failed sending mail', err)
  })

/*
Successfully sent mail {
  accepted: [ 'mycustomer@gmail.com' ],
  rejected: [],
  envelopeTime: 129,
  messageTime: 136,
  messageSize: 413,
  response: '250 OK : queued as 71jiTaUqliiQRb5xMHxja0gU',
  envelope: { from: 'no-reply@mywebapp.com', to: [ 'mycustomer@gmail.com' ] },
  messageId: '<15574d0b-2a51-d854-5755-e2e1b0d29d4f@mywebapp.com>'
}
*/
import smtplib
import email.utils
from email.mime.text import MIMEText

SMTP_SERVER = 'capture.mailsac.com'
SMTP_PORT = 5587
SMTP_USERNAME = 'MAILSAC_USERNAME'
SMTP_PASSWORD = 'MAILSAC_API_KEY'
FROM_ADDRESS = 'no-reply@mywebapp.com'
FROM_NAME = 'Mywebapp Customer Support'
TO_ADDRESS = 'mycustomer@gmail.com'
SUBJECT = 'Password reset'
BODY_TEXT = ('Click on the link to reset you password\r\n'
             'https://mywebapp.com/password-reset/PasswordResetToken'
            )

msg = MIMEText(BODY_TEXT)
msg['Subject'] = SUBJECT
msg['From'] = email.utils.formataddr((FROM_NAME, FROM_ADDRESS))
msg['To'] = TO_ADDRESS

conn = smtplib.SMTP(SMTP_SERVER, SMTP_PORT)
conn.set_debuglevel(True)
conn.ehlo()
conn.starttls()
conn.ehlo()
try:
    conn.login(SMTP_USERNAME, SMTP_PASSWORD)
    conn.sendmail(FROM_ADDRESS, TO_ADDRESS, msg.as_string())
    conn.close()
except Exception as e:
    print('Error: ', e)
else:
    print('Email Sent')

"""
send: 'ehlo [127.0.1.1]\r\n'
reply: b'250-smtp-capture1-172-31-20-37 Welcome! [172.31.20.37:25]\r\n'
reply: b'250-SIZE 1048576\r\n'
reply: b'250-STARTTLS\r\n'
reply: b'250-AUTH PLAIN LOGIN\r\n'
reply: b'250-PROXY PROXY\r\n'
reply: b'250 HELP\r\n'
reply: retcode (250); Msg: b'smtp-capture1-172-31-20-37 Welcome! [172.31.20.37:25]\nSIZE 1048576\nSTARTTLS\nAUTH PLAIN LOGIN\nPROXY PROXY\nHELP'
send: 'STARTTLS\r\n'
reply: b'220 Ready to start TLS\r\n'
reply: retcode (220); Msg: b'Ready to start TLS'
send: 'ehlo [127.0.1.1]\r\n'
reply: b'250-smtp-capture1-172-31-20-37 Welcome! [172.31.20.37:25]\r\n'
reply: b'250-SIZE 1048576\r\n'
reply: b'250-AUTH LOGIN PLAIN\r\n'
reply: b'250-PROXY PROXY\r\n'
reply: b'250 HELP\r\n'
reply: retcode (250); Msg: b'smtp-capture1-172-31-20-37 Welcome! [172.31.20.37:25]\nSIZE 1048576\nAUTH LOGIN PLAIN\nPROXY PROXY\nHELP'
send: 'AUTH PLAIN AG1qbWF5ZXIAdzo4eXBTSkJqZUUxVlM5VkVLdDRueEUwSnNITE0=\r\n'
reply: b'235 Authentication succeeded\r\n'
reply: retcode (235); Msg: b'Authentication succeeded'
send: 'mail FROM:<no-reply@mywebapp.com> size=303\r\n'
reply: b'250 Accepted\r\n'
reply: retcode (250); Msg: b'Accepted'
send: 'rcpt TO:<mycustomer@gmail.com>\r\n'
reply: b'250 Accepted\r\n'
reply: retcode (250); Msg: b'Accepted'
send: 'data\r\n'
reply: b'354 Enter message, ending with "." on a line by itself\r\n'
reply: retcode (354); Msg: b'Enter message, ending with "." on a line by itself'
data: (354, b'Enter message, ending with "." on a line by itself')
send: b'Content-Type: text/plain; charset="us-ascii"\r\nMIME-Version: 1.0\r\nContent-Transfer-Encoding: 7bit\r\nSubject: Password reset\r\nFrom: Mywebapp Customer Support <no-reply@mywebapp.com>\r\nTo: mycustomer@gmail.com\r\n\r\nClick on the link to reset you password\r\nhttps://mywebapp.com/password-reset/PasswordResetToken\r\n.\r\n'
reply: b'250 OK : queued as cp8gFd4tZNmvAbvp_U4lgIhTOpgG\r\n'
reply: retcode (250); Msg: b'OK : queued as cp8gFd4tZNmvAbvp_U4lgIhTOpgG'
data: (250, b'OK : queued as cp8gFd4tZNmvAbvp_U4lgIhTOpgG')
Email Sent
"""
Validate Email Was Received
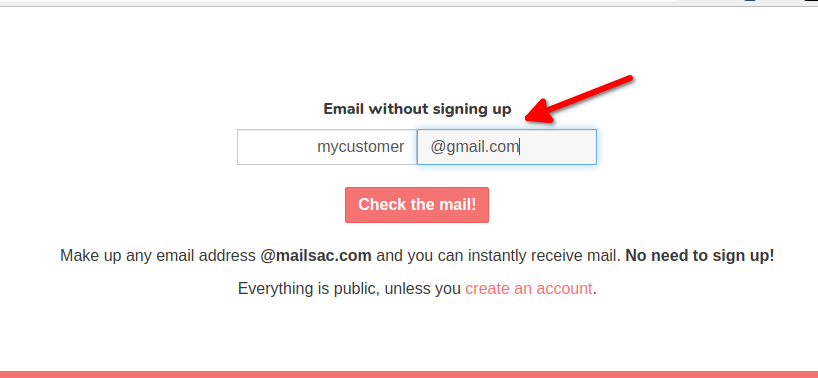
The easiest way to check that an email was received is to use the Mailsac website. Use the “Check the mail!” button on the homepage of the Mailsac website to view the inbox that the email was sent to.
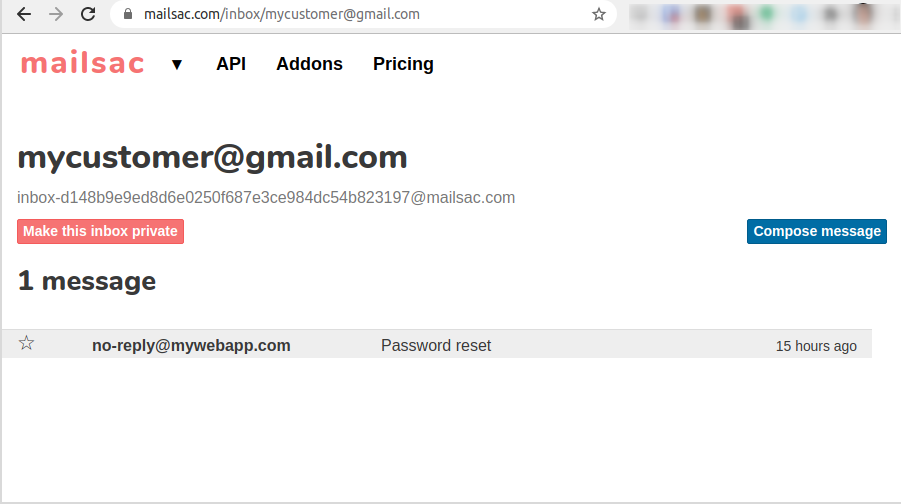
Check any inbox from the Mailsac homepage
Validating an email was received can also be done using any programming language that supports HTTP requests, in combination with the Mailsac API. Code examples for Javascript and Python are provided.
Validate email was received
curl -H 'Mailsac-Key: YOUR_API_KEY_HERE' https://mailsac.com/api/addresses/mycustomer@gmail/messages

# Output from curl
[
  {
    "_id": "9j1rpnMNc2KbgH9hzk0umIgq-0",
    "from": [
      {
        "address": "no-reply@mywebapp.com",
        "name": "Mywebapp Customer Support"
      }
    ],
    "to": [
      {
        "address": "mycustomer@gmail.com",
        "name": ""
      }
    ],
    "cc": [],
    "bcc": [],
    "subject": "Password reset",
    "savedBy": null,
    "inbox": "mycustomer@gmail.com",
    "originalInbox": "mycustomer@gmail.com",
    "domain": "gmail.com",
    "received": "2020-07-05T22:25:41.408Z",
    "size": 603,
    "attachments": [],
    "ip": "98.244.15.2",
    "via": "172.31.27.141",
    "folder": "inbox",
    "labels": [],
    "read": null,
    "rtls": true,
    "links": [
      "https://mywebapp.com/password-reset/PasswordResetToken"
    ],
    "spam": 0.114
  }
]
const superagent = require('superagent')

superagent
  .get('https://mailsac.com/api/addresses/mycustomer@gmail.com/messages')
  .set('Mailsac-Key', 'YOUR_API_KEY_HERE')
  .then((mail) => {
      console.log(mail.body)
  })
  .catch(err => {
      console.log(err.message)
  })
/*
[
  {
    _id: 'ssda77K5zR25P2ErL3Wi8gUnB8-0',
    from: [ [Object] ],
    to: [ [Object] ],
    cc: [],
    bcc: [],
    subject: 'Password reset',
    savedBy: null,
    inbox: 'mycustomer@gmail.com',
    originalInbox: 'mycustomer@gmail.com',
    domain: 'gmail.com',
    received: '2020-07-07T13:52:07.612Z',
    size: 509,
    attachments: [],
    ip: '98.244.15.2',
    via: '172.31.27.141',
    folder: 'inbox',
    labels: [],
    read: null,
    rtls: true,
    links: [ 'https://mywebapp.com/password-reset/PasswordResetToken' ],
    spam: 0.114
  }
]
*/
import requests
from pprint import pprint

headers = {'Mailsac-Key': 'YOUR_API_KEY_HERE'}
url = 'https://mailsac.com/api/addresses/mycustomer@gmail.com/messages'

r = requests.get(url, headers=headers)
pprint(r.json())
"""
[{'_id': '9j1rpnMNc2KbgH9hzk0umIgq-0',
  'attachments': [],
  'bcc': [],
  'cc': [],
  'domain': 'gmail.com',
  'folder': 'inbox',
  'from': [{'address': 'no-reply@mywebapp.com',
            'name': 'Mywebapp Customer Support'}],
  'inbox': 'mycustomer@gmail.com',
  'ip': '98.244.15.2',
  'labels': [],
  'links': ['https://mywebapp.com/password-reset/PasswordResetToken'],
  'originalInbox': 'mycustomer@gmail.com',
  'read': None,
  'received': '2020-07-05T22:25:41.408Z',
  'rtls': True,
  'savedBy': 'mjmayer',
  'size': 603,
  'spam': 0.114,
  'subject': 'Password reset',
  'to': [{'address': 'mycustomer@gmail.com', 'name': ''}],
  'via': '172.31.27.141'}]
"""
Make Captured Email Private
Emails sent via capture.mailsac.com can be automatically
starred, which keeps the email private, by
enabling the Make Capture Email Private option under Account Settings. Starred messages count towards
Message Storage limits.

Traditional Email Flow
Email traditionally flows from an email client (Mail User Agent - MUA), to a outbound SMTP server (Mail Transfer Agent - MTA), to the receiving SMTP server (also an MTA), then to a Mail Delivery Agent (MDA), which is polled by the email client (MUA) using POP3 or IMAP.

By Polluks - eigene Arbeit, ArgoUML, CC BY-SA 3.0, https://commons.wikimedia.org/w/index.php?curid=3645799
Along the way, there are typically several places where authentication and integrity are verified. A sender is typically authenticated when connecting to an outbound SMTP server. The receiving MTA will use SPF records, to validate that the sending MTA is allowed to send the mail, and DKIM records to validate the integrity of the email. Finally, the MUA authenticates against the MDA, typically using a username and password.
Email Capture Flow
In the Email Capture model the Mail User Agent uses Mailsac’s receiving Mail Transfer Agent as the outbound MTA (relay). The Email Capture MTA will accept all mail, regardless of the destination domain.
Considerations
All email sent will be public (Unless sent to a custom domain or configured to be private)
Each message sent will count as an Operation (Op)
Email Capture Use Cases
Email Capture can be used anytime a system needs to send an email, but the email should not be delivered to the customer.
Email Validation in a Non-Production Environment
Non-production environments of applications often do not send email for fear that non-production systems may send email to customers. Using Email Capture, emails can be sent and verified using customer email addresses, without the customer receiving the email.